Tutorials
Facebook Pages: A Beginner’s Guide
Today we’re going to look at the administrator settings for existing Pages. Just to let you understand the terms I will be using, Page refers to a Business Page, also known as a Fan Page, on Facebook. The term “Fan” refers to people who have Liked your Page and comes from the days when “Become a Fan” was the standard button on Facebook Pages. I may use the terms Fan and Like to mean the same thing.
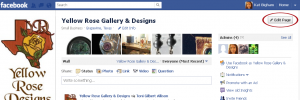
We’ll start by going to the Edit Page button on the right side of the Page’s wall. This will take you to all of the basic settings for your page.
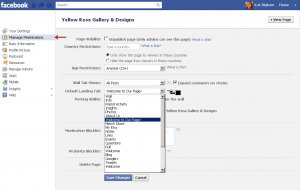
Manage Permissions.
The first screen shows Manage Permissions. Here you see Country Restrictions and Age Restrictions. I highly recommend NOT setting any restrictions for your page, unless you have a page that is specifically for 21 and over or is alcohol-related. (Alcohol-related pages MUST be restricted.) If you choose to set either country or age restrictions on your page, you are also hiding your page from all search engine results, including Google, Yahoo and Bing.
Landing Welcome Tab.
One question I’m asked very often is “How do I set the Default Landing Tab for my Page?” You can set this here on Manage Permissions for all non-fans of your Page by selecting any of the tabs on your page in the drop-down menu. The Facebook default for people who have already liked your page is always your wall. Using an app – that we’re going to discuss in a minute – you can create a custom welcome tab for non-fans to help convert them into fans of your page.
Your Settings.
On the Your Settings tab, you can set Email Notifications to have them sent directly to your email address. This is great for knowing right away when someone has posted or commented on your Page. You also have the option here to set your Posting Preferences to post as your profile and not your Page by unchecking “Always comment and post on your page as [Your Page].” I leave these both checked on all of my own Pages. Once your Page reaches beyond just your circle of family and friends, fans will not always realize that the Page Owner is replying to them if you post as your profile.
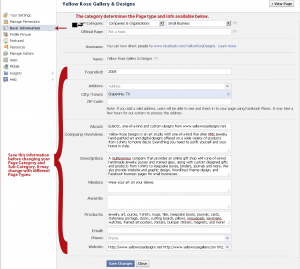
Basic Information.
Basic Information is where you list the information about your company, including your website and contact information that appears on the Info tab of your page. The information you can put here depends on the type of Page you selected when setting up your Page. You can change this at the top with the Category and Subcategory drop down menus. Feel free to try the different categories to see which one gives the best choices for your business. Local businesses will be expected to provide a physical address.
Page Name and Username.
You can select your Facebook Username for your Page here. Once your Page has 25 Likes, you can go to http://www.facebook.com/username/ and create the username that will become the URL for your Page. This can only be set once for each Page and cannot be changed later, so be sure to double check your spelling. Pages with fewer than 100 fans can also change their Page Name here. Facebook recommends not changing your name too often (or too drastically to another name) or your Page may be viewed and reported as spam.
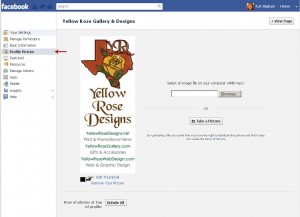
Profile Picture.
If your Page is fairly new, you may not have set a Profile Picture yet. You can add or change your Page’s profile picture here, as well as set the thumbnail that will appear on your posts. Profile pictures for pages can be up to 200×450 pixels, however one source claims the limit is soon to change to 180×450 pixels.
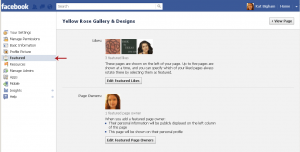
Featured.
Featured Likes.
These pages are shown on the left of your page. Up to five pages are shown at a time, and you can specify which of your liked pages always rotate there by selecting them as featured. You can see here that I’ve added 3 of my other Pages as Featured Likes, allowing the rest of the Page’s Likes to rotate into the additional 2 spaces available.
Featured Page Owner.
By adding your profile as a Featured Page Owner, you can create a sense of trust with your fans. People buy from us when they know, like and trust us. It gives them the opportunity to get to know the person behind the Page that they interact with. As a Featured Page Owner, your Page will also be linked on your personal profile, giving your friends the opportunity to easily find and Like your Page.
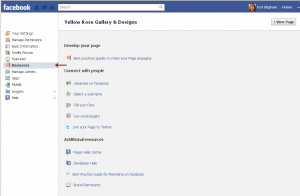
Resources.
Facebook’s Page Resources has links to helpful information for advertising on Facebook, the Pages Help Center, social plugins you can use on your websites as well as additional help links. Here is also where you’ll find the “Link your Page to Twitter” link so your posts will auto-feed to your Twitter account. Note: You can only link one Page to one Twitter account; multiple Admins cannot all link the Page to multiple Twitter accounts.
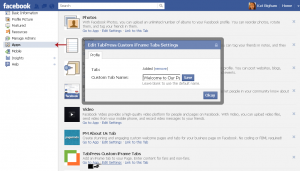
Apps
This is where you’ll find all of the Apps you’ve added to your Page, including your custom tabs. If the tab doesn’t show up on your page or if a tab’s name can be changed, you can do that here by clicking Edit Settings.
What other apps can I use on my page? How do I find them?
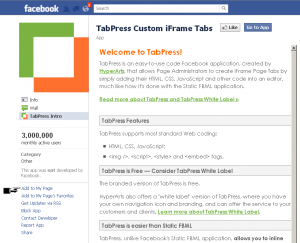
The app directory has been removed, but all available apps on Facebook will have its own Facebook page where you can add it to your Page. When you see an app that you like on someone else’s page, you can check if there’s a link to the app developer, or even let them know you like their custom tab and ask who built it for them. Once you find the app that you want to use, follow their directions for getting it set up. Most will have an “Add to My Page” link like this one on TabPress:
Here are some additional apps that I use on my Page:
- My Etsy – https://apps.facebook.com/myetsy/?fb_page_id=46028254998
- Mail Chimp – http://connect.mailchimp.com/integrations/shortstack-for-facebook
- TabPress – https://www.facebook.com/apps/application.php?id=176217385757369&sk=app_195227247178799
TabPress is the free custom welcome app that I recommend. You are allowed one TabPress tab per Page, which includes a fan gate.
(If you choose not to use the fan gate, simply paste the same code in for fans and non-fans.)
Additional custom tabs/apps (I have not tried all of these and cannot fully recommend them. You can try them out to see if they may work for you).
- Wildfire Custom Tab – http://iframes.wildfireapp.com/
(Wildfire uses only limited html and cannot exceed 520x800pixels without scrollbars. Recommended for the most basic custom tab. Cannot be used with Zazzle flash or blog panels.) - Pagemodo Custom Tab – http://www.pagemodo.com/
(The free version of Pagemodo is limited to their templates. Recommend ONLY for someone who cannot add their own HTML/host their own images. Of the custom apps that I tested, Pagemodo is last on my list.) - TabSite – http://www.tabsite.com/
(Have not fully tested.) - Tabfusion Custom Tab – http://www.facebook.com/apps/application.php?id=191519890879051
(Have not fully tested.) - North Social – http://northsocial.com/apps/
(Highly recommended, paid subscription applications. Have not tested.)
Wrapping Up. Bonus Q&A.
Why Can’t I use my personal profile for my business?
Facebook expressly states that personal profiles may not be used as business pages, no one may have more than one profile, and two people (such as business partners) cannot share a personal profile. In addition to the threat of having your profile removed and having to start over, personal profiles have a limit of how many friends they can have. Pages have no such limit and do not need to approve people to Like their page as you do with profiles. In addition, Pages have features unavailable to profiles, such as Welcome tabs and other applications.
How do I create a Facebook page?
Go to http://www.facebook.com/pages/create.php.
How do I add my page to my personal profile?
By adding yourself as a Featured Page Owner, your Page will also be listed on your Profile under Pages (shown under the friends’ list on older profiles, and in the About section of the new “timeline profiles“). If you want to feature your Page as your Employer instead of the generic community page, watch my video tutorial, “How to Add Your Facebook Page as Your Employer“.
How do I keep my profile and page separate?
Some people don’t want their customers finding their personal profiles. The Featured Page Owner is off by default so unless you follow the steps listed above, your profile and page will not be linked. Adding a generic name (such as “Self-employed”) under your work link will also prevent customers from connecting your profile with your page. Or you may want to follow the video instructions for adding your page, but change the setting from “Public” to “Friends Only”, so friends can have access to your page, but non-friends cannot. If you’re extremely concerned about privacy, be sure to check your profile privacy settings on a regular basis.
Speaking of Privacy . . . Can I make my Page private for friends/clients only?
No. All Pages on Facebook are designed to be public-facing. Setting the Page Visibility as “unpublished” makes the page visible for admins only – for example, when you’re first building the page, or making updates you don’t want to be seen by fans yet. If you prefer to have a private place on Facebook for your clients, you might consider setting up a Closed Group.
Why should a Page have more than one admin?
While most small business owners and entrepreneurs are sole proprietorships, you may want to consider adding a trusted friend or family member as an admin to your page. This way, if anything were to happen to your personal profile, you will still be able to access and run your Page. If your personal profile is ever hacked or lost, your Page admin rights will be lost along with it, and may not be easily transferred to a new profile. For companies with more employees where the person running the Page is not the owner, having more than one admin is a MUST. If that person ever leaves the company for any reason, all admin access is lost if they were the only admin. It happened to one of my larger clients (a company with over 350 employees) and their only option after the social media manager left for another position was to start a new Page, losing all their existing fans, as well as their custom URL.
How do I get Likes on my Page?
This question is asked by every page owner on Facebook. While there is no secret formula for getting more Likes, there are things you can do to ensure people find your Page. The rest is up to you.
- Do not hide your page from search engines by setting country or age restrictions.
- Have a custom Welcome tab for non-fans reminding them to Like your Page.
- Use a “Fan Gate” for non-fans with offers for fans only.* (See below regarding contests and fan gating.)
- Set your Page as your Employer on your personal profile on Facebook.
- Be sure to include your Facebook Badge on all your websites.
- Find out the rules of any online communities you belong to and post your Facebook Page in the appropriate areas of those communities.
- Sign in as your Page and Like other pages that complement yours. By Liking other pages, you can comment there as your Page, not just your personal profile. A word of caution: Make sure your posts and comments on other pages are relevant to that page or your posts will appear to be (and be reported as) spam. Your goal is to gain recognition, not steal another Page’s fans.
- Network! Join local networking communities and tell them about your Facebook Page.
- Promote! Promote! Promote! – Promote your Facebook Page everywhere you do your website. Add a link to e-mail signatures, your business cards and all your other social media profiles and sites, including Google+, Twitter and LinkedIn. Zazzle users be sure to add your Facebook Page to your Zazzle Members Profile as well as all of your Shop Profiles. Tweet your page, asking your Twitter followers to also Like you on Facebook.
Want to get more True Fans? The best way to do this is to engage your current ones. Post daily if you can so they don’t forget you. When your fans comment on your posts, reply to them. Keep your replies as positive as you can and whenever possible, keep the “conversation” going by asking questions. The more fans comment and like your posts, the higher Facebook will rank you in their algorithm and their friends will see their comments in the ticker and newsfeed. Ask your fans to tag themselves on your photos. The fan page of Twig, the Fairy does this so well that many of her photos reach the tag limit within minutes of posting new photos. I also recommend not using any of the auto-post applications that allow a program to add posts to your Page. Not only does this limit how links and image thumbnails appear, the more people use a given application, the less likely your post is to appear on the newsfeed of your fans. While we have no control over fans hiding us in their own newsfeed, as a Page admin, you don’t want to use tools that automatically hide your posts to begin with!
A word about giveaways, drawings and contests.
Facebook guidelines clearly state that you may not use Facebook “features or functionality” as a way for people to enter contests, promotions or sweepstakes. That means using the Like button on your page, posts, comments, or photos; or commenting on or sharing your posts or photos.
“But I see other pages holding contests on Facebook all the time!”
My personal opinion of such contests held on Facebook that clearly violate their guidelines is to look at it like speeding. Yes, other people do it all the time. That won’t help you when you’re the one who gets pulled over. Neither will not knowing the speed limit. You will be the one getting the ticket. The question is, can you afford to pay the cost? Can you afford to have your page taken down, losing all your fans and established branding?
“So how can I use Facebook to run a contest or giveaway?”
Coupons are allowed, however the coupon must be available to all fans of the page (ie: the coupon cannot be offered to a “winner”, which would make it a contest, not a coupon). Using a custom app tab, canvas page app, or fan gate* app are also allowed. “Promotions on Facebook must be administered within Apps on Facebook.com, either on a Canvas Page or an app on a Page Tab.” One such use of a promotional giveaway app can be seen on HolyClothing. They engage their fans regularly offering giveaways using an app from North Social as permitted by Facebook’s guidelines. They also do a very good job with the legal disclaimers required by Facebook.
If you can’t afford to pay for a professional canvas page app and still want to use a promotional giveaway as an enticement to Facebook fans, consider holding a contest OFF Facebook on your own website or blog. Use a blog comment section, ask people to sign up for an email list, or have a contest entry form on your website for your giveaways and contests. Tell your Facebook fans about your contest in status updates and links back to the contest page. If your fans are aware that they can find out about upcoming specials, discounts, promotions and even contests held on your website through your Facebook Page, they will stay engaged with your Page more often.
*Welcome Tabs and Fan Gates
What is fan gating? By using a custom welcome tab for non-fans, you can create content to entice them to Like your page. Many Pages use coupons only available for fans, or offer links to special prices and discounts that will appear only after clicking the Like button. (Reminder: If you use a fan gate as part of a promotional giveaway or contest, be sure to also include the required legal disclaimers from the Facebook Promotion Guidelines. Fan gates ARE page apps, and can be used this way as long as the requirements under #2 on the Guidelines page are met.) FYI: Because of rampant abuse from spammers, Pages are no longer allowed to hide the Page Wall from non-fans. Fan gates will not hide the wall or other information on your page.
I use and recommend TabPress for the Welcome Tab on my Page.
Additional Resources.
- Yellow Rose Web Design Tech Blog
Whenever there is a change that affects Facebook Page Owners, I do my best to outline the changes and help you make the best use of your Page. - 360 Admin
- Facebook Pages Help Center – The official Facebook Pages guide.
- Facebook Badges
- AllFacebook.com
Note: AllFacebook.com is not associated with Facebook and the opinions of some of their writers are biased against Facebook. They are a good source of information when there is a change, bug, virus, or updated FB policy. - http://www.squidoo.com/facebookpage
This squidoo page contains some information that is outdated as of October, 2011, however there are some good tips here, including information about Community Page types. - Snopes.com
Heard the latest rumor about Facebook? Are they going to start charging users? Is content posted to your profile without you knowing it? Check Snopes FIRST before spreading the rumors!
If you have any questions, feel free to comment. And don’t forget to LIKE my Page! http://www.facebook.com/YellowRoseDesigns
——————–
Edit: I’ve received a comment on this post that stated, in effect, that Facebook Pages can be used for everything from e-commerce to fully blown websites. Er, NO. Just…. no. Can they? Sure. Should they? NEVER. Why in the world would you tie your entire online existence to a site and company that changes its policies every 6 months??? My advice: Social media marketing IS a must have in today’s online environment. It is a marketing tool, and can be a great gateway to new clients, or conversations with existing clients. It is not, and never should be, a replacement to your own branded online presence. Never. (Just like comment spam should never be used on a competitor’s website to attempt to draw away potential clients. This is not a debate site, fella, it’s my business. All comments are always moderated. ![]() )
)
How to Add Your Facebook Page as Your Employer
Here is a quick and easy way to add your Facebook Fan Page to your profile as your employer. You’ll want to go to the Edit Profile button. Then go over to Education and Work, and in the Employer field start typing in your Fan Page name exactly as it appears on the page. Select the correct fan page from the drop down list. You’ll also want to be sure that this is shown to the Public so that anyone, whether they’re a friend or not, can see that you work for Yellow Rose Gallery & Designs and immediately link over to the page. You can type in the position of the person, and also the city and town where they work, as well as a description, like a job description. And you want to be sure that “I currently work here” is also checked. Now click “Add Job”. And now you can go back to the profile and see that this person is an Artist at Yellow Rose Gallery & Designs. Now when someone comes and clicks that link, they’re immediately taken to the correct fan page.
(Having trouble viewing the video? Click over to Youtube and select the Large Player option. Don’t forget to Like and leave a comment too! I’d love to know if you found the video helpful!)
